To understand how to make a catalog, start by choosing the products and defining how they should be grouped. Then prepare product details and images, plan the page structure, design each spread, and check the finished file. The goal is a catalog that helps readers find, compare, and choose products easily.
Yes, a catalog often gets opened when nobody from the sales team is in the room.
A buyer takes it home. Leaves it on a desk. Opens it again days later. Maybe marks a few products, circles a price, or sends a page to a colleague.
That makes a catalog different from most marketing materials. An ad gets a few seconds. An email can disappear into an inbox. A social post can be forgotten before the day is over. A catalog has a chance to stay around and keep selling after the conversation has ended.
But that only happens when the pages do their job.
If products are difficult to compare, buyers have to work harder. If important details are missing, questions remain unanswered. If the layout gives every product the same weight, the products that matter most can easily get lost.
Making a catalog well is therefore less about decoration and more about making the right decisions in the right order.
But here is the good news for you.
This guide breaks the process of making a catalog into clear steps, from choosing the catalog's purpose and organizing the product range to planning pages, preparing content, designing the layouts, and getting the final files ready for print or digital use.
So, let's get into it!
How to make a catalog
The easiest way to make a catalog is to begin with the products, not with the design. Decide what to include, how to group it, what buyers need to know, and how the pages should guide them through the range. Once that structure is clear, the visual work has something solid to follow.
Now we’ll walk through how to make a catalog in nine steps, starting with what belongs in it and ending with the finished file. You’ll see how product information, images, page structure, and visual choices fit together. The right sequence keeps small decisions from becoming bigger problems.
Ready to explore? Let’s begin.
Step 1: Decide the single job the catalog has to do
One job only. Before thinking about pages, photography, or layout, decide what the catalog needs to achieve. It might be to:
Open new wholesale accounts
Increase average order value
Replace a sales conversation you repeat often
Support a trade show or sales event
A catalog asked to do four things at once will struggle to do any of them well. Choosing one main purpose gives the rest of the project something to work toward.
Here is the test, and it is a simple one. Name the single action a reader should take after closing the final page. If that action is unclear, the catalog is not ready to be designed.
Write that action down and keep it visible throughout the project. When questions come up about page count, pricing, photography, or product selection, return to that decision. It gives those choices a clear direction.
Step 2: Write down exactly who opens it
Before thinking about pages, think about the person who will open the catalog. Name the buyer type, their product knowledge, and what matters most to them. Also consider what they do with the catalog next:
Compare: Do they compare products mainly by price or specification?
Share: Will they forward the catalog to someone else?
Carry: Will they take it into a meeting or showroom?
Mark up: Will they write notes beside products or prices?
These details shape every page that follows. A retail buyer may need inspiration first and product details second. Strong photography can lead the page, while specifications support the decision.
A trade buyer often works differently. SKUs, minimum order quantities, and lead times may need to sit beside the product image. The catalog becomes part of the ordering process, not just a way to browse.
So, design the page around the person who is actually making the buying decision. The more clearly that person is defined, the easier it becomes to decide what each page needs to show.
Step 3: Choose format, page count, and binding
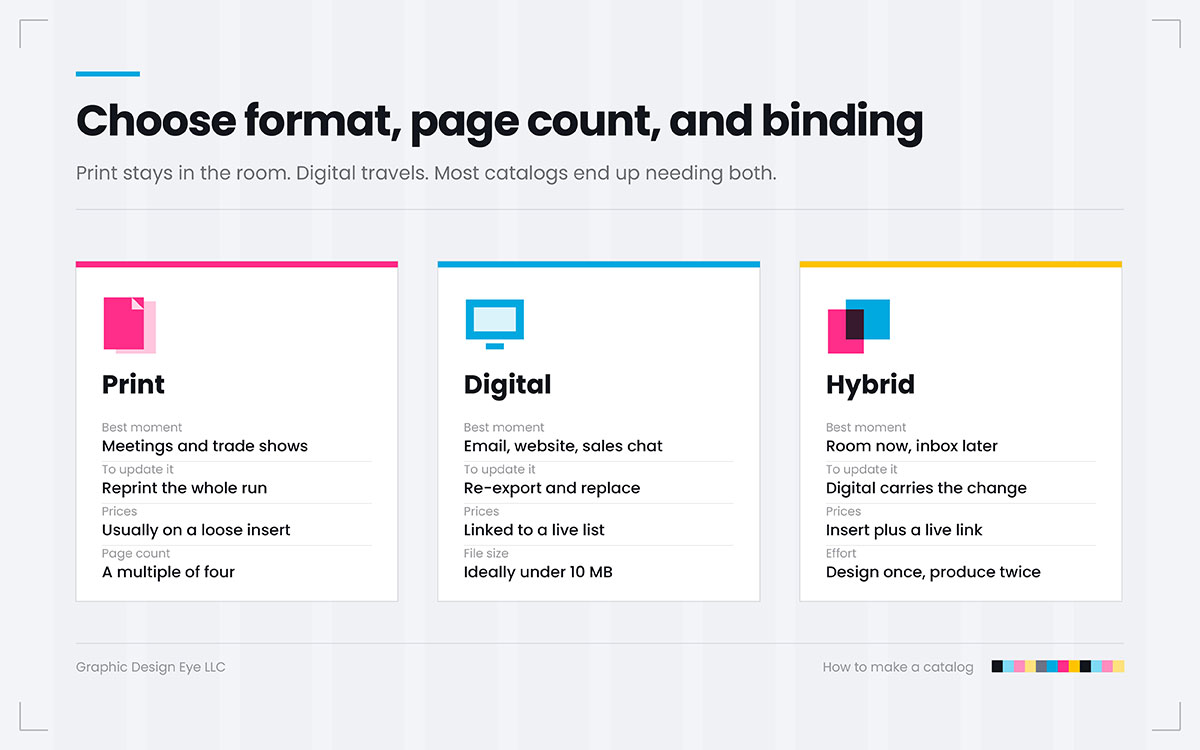
Print, digital, or both? Each format has a different job. Print is the catalog left behind after a meeting and picked up again later. Digital is the version sent in seconds, updated whenever needed, and shared with customers anywhere. For many businesses, using both makes the most sense. Create one master document, then prepare separate print and digital versions from it.
Before setting the page count, decide how the catalog will be bound. This matters more than it may seem, especially for a first catalog.
If saddle stitching is the plan, the page count must be a multiple of four. Each sheet folds into four printed pages. Missing this detail can create problems when the files reach the printer.
Saddle stitch usually works well for catalogs of around 48 to 64 pages, depending on the paper. Larger catalogs may be better suited to perfect binding, which gives the catalog a flat spine and a more substantial feel.
For a first edition, 16 to 24 pages is a practical starting point. It gives enough room to show the product range without making the project too difficult to finish. A finished catalog is far more useful than a perfect one that never reaches the press.
Print, digital, or hybrid
Print, digital, and hybrid catalogs each win in a different moment, and the right choice depends far less on your budget than on where your buyer actually meets you. The table below compares all three across the five decisions that matter most: when each format works, what an update costs, how prices are handled, how results are measured, and where the spend goes.
Consideration
Print edition
Digital edition
Hybrid approach
Best moment
Meetings, trade shows, showrooms, mailings
Email follow-up, website download, sales chat
Print for the room, digital for the follow-up
Update cost
Reprint required for any change
Re-export and replace the file
Digital carries changes, print carries the season
Prices
Often held on a separate insert
Can be embedded or linked to a live list
Insert in print, live link in digital
Measurement
Codes, unique URLs, or dedicated phone lines
Downloads, page reach, link clicks
Both, tied to one campaign name
Typical spend
Design plus print run plus postage
Design only, with hosting or a viewer
Design once, produce twice
Step 4: Curate ruthlessly
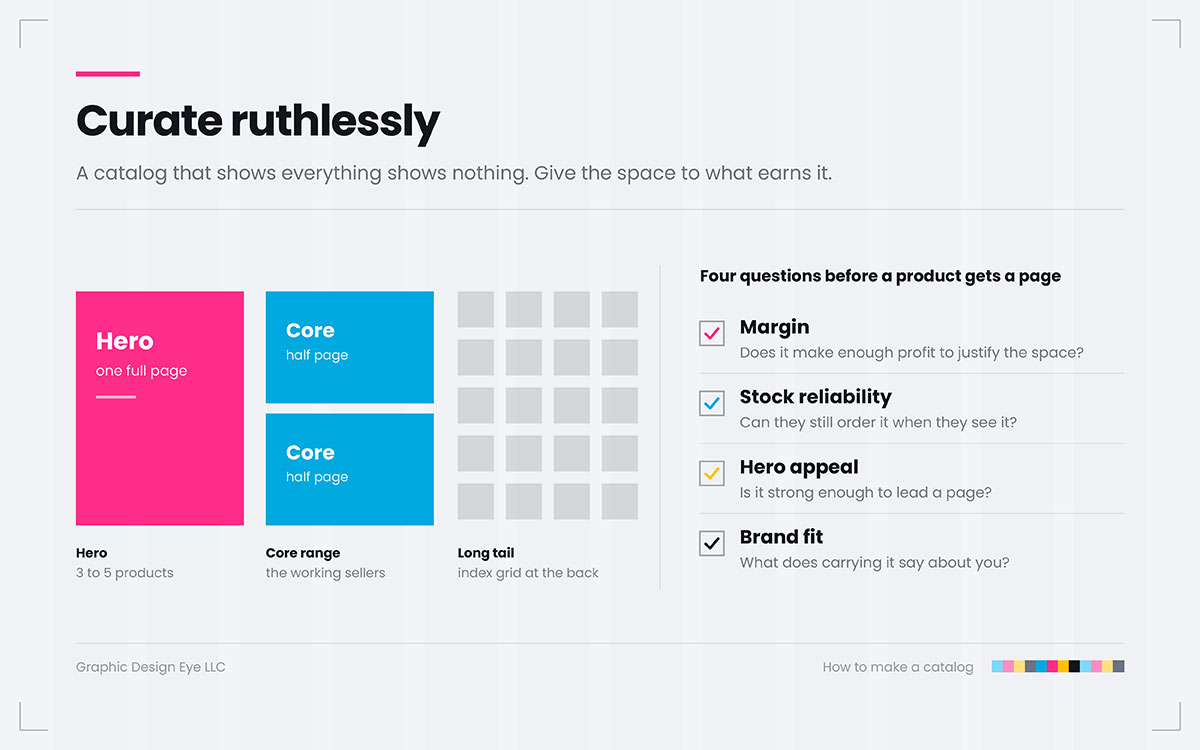
Not everything you sell deserves a page. Yes, you read that right. A catalog is not a storage place for every product you carry. Select the products that deserve attention based on four things:
Margin: Does the product make enough profit to justify the space?
Stock reliability: Can customers still order it when they see it?
Hero appeal: Does it have the visual or commercial strength to attract attention?
Brand fit: What does this product say about the business?
That last point is easy to overlook. A catalog does more than list products. The products chosen also shape how the business is perceived. A discontinued line with three units left may create more disappointed enquiries than sales.
A catalog that shows everything shows nothing. Buyers need help finding what matters. Give hero products a full page and core products a half page. Put long-tail items into a grid or simple index at the back. They remain available without taking attention away from the products that deserve it most.
Good curation makes the catalog easier to browse and gives the product range a clear order. The goal is not to show less for the sake of showing less. It is to give the right products the space they deserve.
Step 5: Build the product data sheet before you open any design software
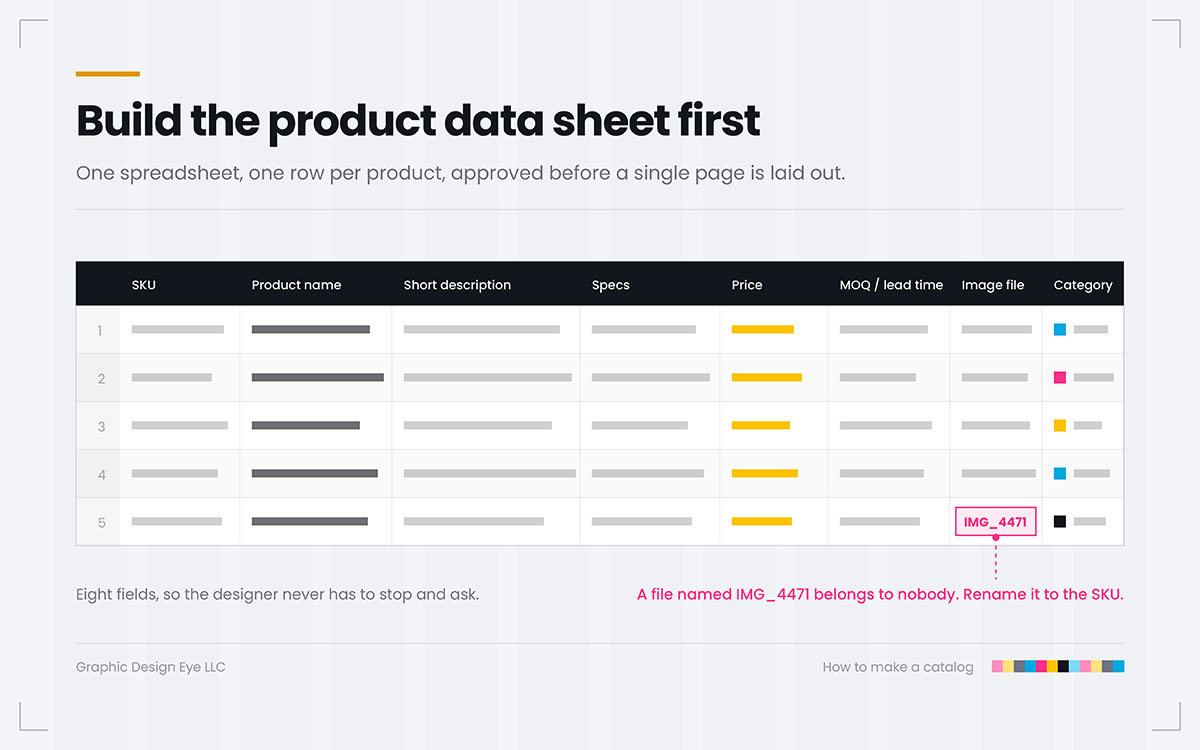
Yeah, this is the step that can save the whole project, and it is the step most owners skip. One spreadsheet. One row per product. Get it checked and approved before a single page is laid out.
The reason is simple: late changes cost money. Every change to a price or product detail can send the designer back to adjust the pages. And once several pages need changing, the work can quickly become a rebuild.
A data sheet approved in week one may take an afternoon to prepare. The same corrections made in week five can mean reworking pages that are already designed.
Minimum product data sheet fields
A product data sheet is the single spreadsheet every page of your catalog is built from, and it should be complete and approved before any design work begins. These eight fields are the minimum a designer needs to lay out a page without stopping to ask you a question, along with the failure each field is quietly there to prevent.
Field
Why it is required
Common failure
SKU or product code
The one value connecting catalog, invoice, and stock system
Codes that differ between the spreadsheet and the warehouse
Product name
The exact name used everywhere else the buyer will see it
Marketing name in the catalog, internal name on the invoice
Short description
The 15 to 25 word line that sits under the image
Copy written to fill space rather than to a fixed length
Retail, trade, or both, stated with the terms that apply
No decision on whether prices are printed or held on an insert
Minimum order and lead time
The two questions every trade buyer asks next
Omitted, forcing a phone call that loses the order
Image file name
Links the row to an approved, correctly named asset
Files named IMG_4471 with no owner and no version
Category and page group
Determines running order and the contents page
Categories invented during layout instead of before it
Step 6: Prepare photography and visual assets
Before taking or collecting product photos, decide what the images need to meet. For print, use images at 300 DPI at their final placed size. Use CMYK or RGB with an agreed conversion profile. For digital catalogs, sRGB at 150 PPI is usually enough. This also keeps digital files easier to share.
Do not rely on images taken from your website. Website images are often compressed for faster loading. They may look fine on a screen but print soft or muddy. A catalog needs images that stay clear at their actual print size. For more on why image quality matters, see our guide to the different types of product images for eCommerce and where each one belongs.
Image quality is only part of the job. The photos should also feel like they belong together. Keep the background, lighting direction, shadows, and crop style consistent across the product range. This makes the catalog feel more organized and helps customers focus on the products.
Older product photos can make this difficult. A catalog may contain images taken years apart by different photographers. In that case, background removal and colour correction can help bring them closer to one visual standard. This may save the time and cost of photographing the entire range again.
Step 7: Write the copy blocks to a fixed length
Once the page structure is taking shape, the product copy needs to fit that structure. Decide how much space each product gets before writing the descriptions. Then keep the copy close to that length throughout the catalog.
This matters because uneven copy can quickly make a page look messy. One product may have three lines while another takes up half the page. Keeping the copy consistent helps the layouts stay balanced and makes the catalog easier to scan.
A simple product copy structure can include:
Product name
One short benefit line
Two to four specification lines
Price
SKU or product code
Category introduction pages can have a little more personality. Use two or three sentences to explain the category and help readers understand what they will find there.
Keep the writing focused on useful information. Customers should not have to read a long paragraph to understand what a product offers.
Step 8: Choose your build route, then design the pages
There are several ways to make a catalog. The right choice depends on the size, complexity, and purpose of the project.
Use a template tool: Suitable for smaller catalogs with simple layouts.
Customize a ready-made template: Gives a stronger starting point while allowing changes.
Hire a freelance designer: Useful when the catalog needs custom design work. Hiring a graphic designer suits a single edition with a settled product range.
Work with a design agency: A practical choice for larger or more complex projects.
Once the approach is decided, start building the pages. Keep the layout consistent so customers know where to look for product information. Give product names, images, descriptions, prices, and key details a clear place on the page. Leave enough white space to keep the layout comfortable to read.
As the catalog grows, consistency becomes even more important. When a customer understands one product page, the next should feel familiar.
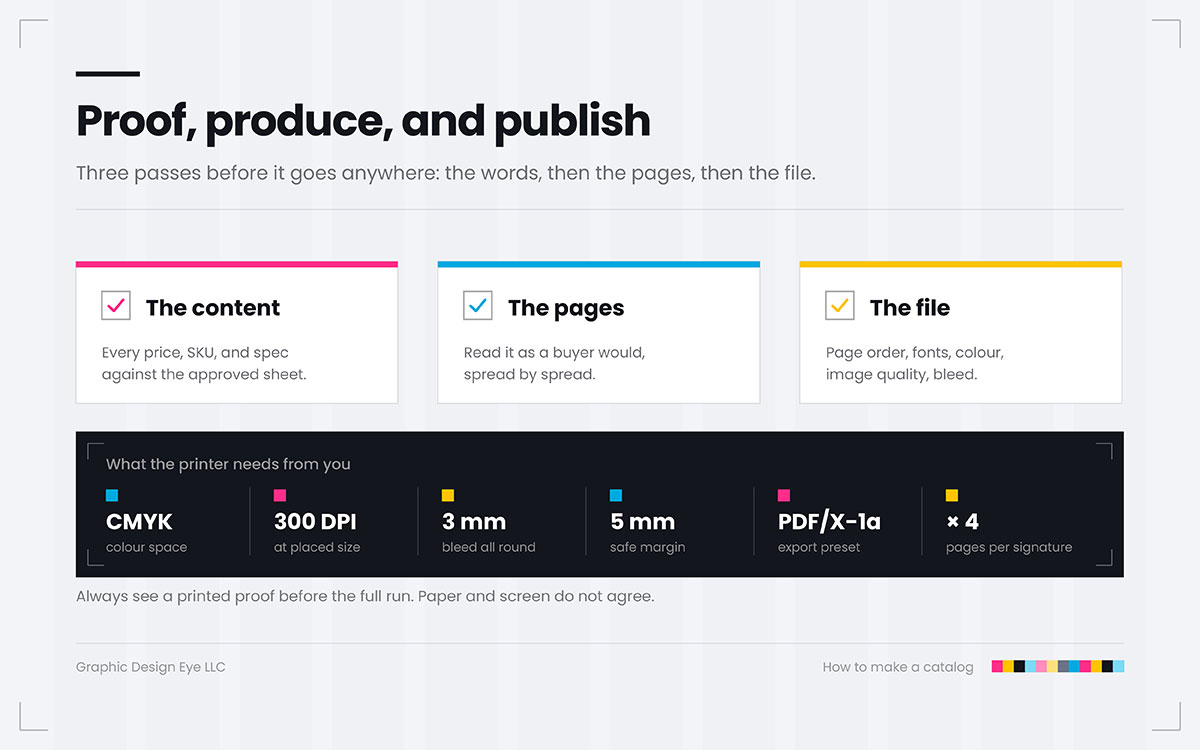
Before publishing the catalog, give it three careful checks. Each check has a different purpose.
Start with the content: Compare every product, price, SKU, description, and detail with the approved information. This catches small mistakes before they reach customers.
Then check the pages visually: Look at the catalog as a buyer would. Make sure the layouts feel consistent, the text is easy to read, and nothing looks out of place.
Check the file itself: Look for the correct page order, fonts, colors, image quality, and bleed. These technical details matter when the catalog goes to print.
If the catalog will be printed, always review a printed proof before the full run. Colors can look different on paper than they do on a screen. If the printer offers a calibrated digital proof or wet proof, review it carefully and approve it before printing.
Production file specifications
Print and digital editions demand different files, and supplying the wrong one is the most common reason a catalog is rejected at the press or arrives unreadable on a phone. The specifications below cover colour space, resolution, bleed, margins, binding, fonts, and export presets for both editions. These are the values to confirm with your printer before you export anything.
Specification
Print edition
Digital edition
Colour space
CMYK, or RGB supplied with an agreed conversion profile
sRGB
Image resolution
300 DPI at final placed size
150 PPI, 72 PPI acceptable for mobile-only
Bleed
3 mm or 0.125 in on every outer edge
Not required
Safe margin
Keep text 5 mm or 0.25 in inside the trim
5 to 8 percent padding for small screens
Page count
Multiple of four for saddle stitch
Any count
Binding
Saddle stitch to roughly 48 to 64 pages, perfect binding above
Not applicable
Fonts
Embedded or outlined in the supplied PDF
Embedded
Export preset
PDF/X-1a or PDF/X-4 as the printer specifies
Interactive PDF, compressed, ideally under 10 MB
Spreads or pages
Single pages, the printer imposes them
Spreads for desktop, single pages for mobile
Make a catalog of FAQs
Got a few questions about making a catalog? That is completely normal. There are decisions about products, pages, images, formats, and printing that can get confusing along the way. The FAQs below cover the questions that come up most often and keep the answers practical. And if your question is not here, feel free to reach out.
For a first edition, 16 to 24 pages is a practical range. It gives enough space to present products without making production difficult. Saddle-stitched catalogs usually need page counts in multiples of four. For catalogs above roughly 48 to 64 pages, perfect binding is often more suitable.
Yes, especially for smaller catalogs. A template can work for fewer than 20 pages with consistent products, clear information, and a simple layout. Larger catalogs, changing product ranges, or brand-focused businesses often benefit from professional design to maintain consistency and presentation quality.
Choose based on how customers use it. Print works well for meetings, showrooms, events, and direct mail. Digital catalogs are easier to update and share. Many businesses use both. A master design can be adapted for print and digital versions with the specifications adjusted for each format.
No. Prices can be provided separately, especially when they change frequently or vary by customer. A separate price list can keep the main catalog useful for longer. This approach also works well for trade catalogs where pricing may depend on accounts, quantities, or negotiated terms.
Update the catalog according to how often products, prices, and availability change. Many businesses issue print catalogs annually or seasonally, while digital versions can be updated whenever needed. Assign one person to review product information regularly so outdated prices, discontinued items, or incorrect details do not remain unnoticed.
Send a press-ready PDF using the printer’s required specifications. Common requirements include 3 mm bleed, 300 DPI images at placed size, and embedded fonts. Printers may request PDF/X-1a or PDF/X-4. Always confirm their preferred color profile, bleed, and export settings before sending the final file.
Endnote
And that brings us to the end!
Not every catalog project starts with a blank page. Sometimes the product list is already complete. The images are ready. Prices and descriptions have been approved. The business knows what needs to be included. What is missing is the part that turns those materials into a finished catalog.
That does not mean starting over.
The making process can begin with what is already there. Organize the information. Group the products. Decide how the pages should flow. Then build the design around the material instead of forcing the material into a design that was chosen too early.
The same thinking applies when reviewing the finished catalog. Can customers find the right product? Can they understand its details? Can they compare options? Can they find what they need to order? If those answers are clear, the catalog is doing its job.
Have the content ready but need help bringing it together? Graphic Design Eye can take care of the catalog design, page layouts, product image editing, supporting content, and print-ready preparation.
A finished product list is a strong start. It just needs the right design to become a finished catalog.
And with that, we’ll call it a day! If you have a catalog idea taking shape, send us a message.
Graphic Design Eye LLC is a full-service creative agency built for brands that demand more than design — they demand vision. From strategic branding to complete visual identity, we partner with startups, agencies, and growing businesses as a dedicated creative force. With flexible subscription and project-based models. Let's start with us today!