Think of your website as your digital portfolio. It's the very first example any prospective clients will see of a freelance photographer, so it helps to put on a good face.
Anyway, why can a website be so important? It's more than just displaying your work. Actually, your portfolio showcases your artistic vision. Think of it as your online storefront. Here, visual content and branding leave a lasting impression.
Let's talk about user experience. Your photography website isn't just about images. It engages the audience with an experience. This elevates your professional standing.
Now, let's discuss the 8 necessary elements for every photographer's website. We'll help you understand specific practical tips to make your website design engaging and facilitate visitor-to-client conversion. They will assist in converting visitors into clients.
Personally, I believe that no matter your level of experience, mastering user-friendly photography websites is crucial. So, this article guide offers practical tips to help you. Your online platform should showcase your photography work and boost your reputation. Ready to build your perfect website? Let's dive in.
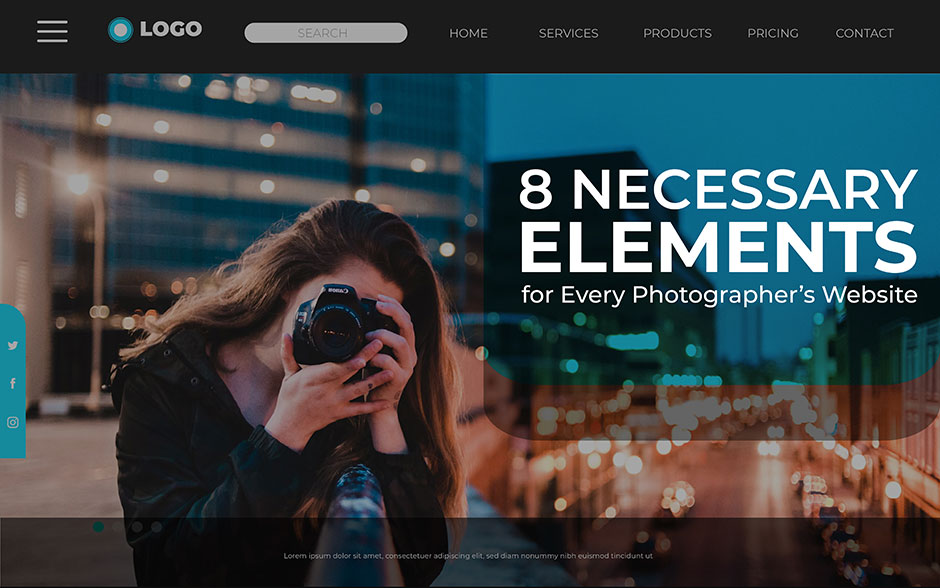
8 Necessary Elements for Every Photographer's Website
If you’re a seasoned professional or just starting out, your website as the virtual front door to your creative world. To make a lasting impression and stand out in a competitive industry, every photographer’s website must include essential elements. From stunning visuals to seamless functionality, these components not only highlight your photography but also ensure a smooth and engaging experience for visitors. Let’s explore the top 8 necessary elements for every photographer's website.
1. Need to photograph the brand logo
If customers have to make a purchase decision, professionalism usually is at the top of some, if not all, their lists. Of course, this also applies to you and me. You, as a photographer, are offering some service. Your brand logo should be able to leave the first impression when they go to your website.
An impressive, professional logo will convey to the client that you are serious about your business and you run your career in photography on a professional basis. This will build trust in the client's mind, and that is the basis for establishing a successful business.
Hopefully, you will understand that a creative logo is essential. There is just one thing you need to keep in mind: a lousy logo can sometimes hurt your photography business. You should be very careful while choosing a customized photography logo.
Powerful Tips to Design Effective Logos: Dos and Don'ts
Dos
Don’ts
✅ Reflect Your Style: You want your logo to not only represent the kind of photography you do but also your style—classic, modern, minimalist, vibrant.
❌ Overcomplicate: Stay clear of cluttered designs or fine details that become unclear when shrunken.
✅ Keep It Simple: Simple design tends to be more memorable and flexible across different mediums.
❌ Use Generic Icons: Avoid generic photography icons that will not set your brand apart.
✅ Choose Colors Appropriately: Select those that best make your photography rewarding and express correct emotions—for instance, offloading blues or energetic oranges.
❌ Overuse Colors: The usage should always be limited to very few complementary colors to provide a sense of unity and avoid visual overcrowding.
✅ Scalability: Your logo should look good in various sizes, from a large header on your website to a small watermark on your photos.
❌ Copy Others: Your logo must be original and singular to help differentiate your brand from the competition.
✅ Typography Matters: If you're going to use text, then use a readable font that has some personality and matches your brand.
❌ Rely Solely on Trends: While trends can undoubtedly inspire, the logo design should never be based on fleeting fads.
✅ Consider Symbolism: Incorporate elements or symbols representing your discipline, such as a camera or lens aperture.
❌ Forget Legibility: Check that any text is legible, even in small sizes.
✅ Emphasize Versatility: A logo must look good in color yet hold its own well for black-and-white formats.
❌ Misrepresent Your Brand: The presentation of the logo design itself reflects both the style and quality of your photography.
✅ Test for Impact: Get feedback from peers or clients to ensure that your logo has the right response for the target audience.
❌ Be Afraid to Iterate: It's totally alright to refine your logo with time as the brand evolves. You don't have to lock up in your first design.
2. Stunning Photography Image Gallery
A beautiful photographic image is the lifeblood of any photographer's website. It means more than just pictures taken. They are your story, representing the essence of your artistry and the heart of your portfolio. High-quality, captivating photos grab attention in a split second. They speak without words. They tell your story in a way nothing else can. They show your skills, your creativity, and your unique vision. They are your visual resume. Every shot, every detail matters.
Importantly, potential clients look at these images and see what you can offer. I'd argue that they see your professionalism and dedication. They see the magic you can create. That could work, but from breathtaking landscapes to intimate portraits, each image should take them on a journey. A journey that leaves them in awe.
In my view, this is something on which there isn't a single compromise one can make by investing time and effort to curate and showcase your best work. It's the key to success. It's what makes a lasting impression—one of the key ingredients. It's what helps you resonate with your audience emotionally.
Powerful Tips to Make Your Portfolio Stunning: Dos and Don'ts
Dos
Don’ts
✅ Show Off Your Best Work: Make sure to include a variety of excellent images that are representative of your work.
❌ Overload with Images: Make sure to curate your portfolio to include only your best work.
✅ Organize Thematically: Your portfolio should be organized under categories like portrait, landscape, etc. For easier glancing through.
❌ Use Poorly Edited Images: Only share polished, professional photographs.
✅ Show Variety: Show how versatile you are in various genres of photography.
❌ Forget Loading Speed: Optimize your website to load faster.
✅ Focus on Quality: Feature impactful images over mere quantity.
❌ No Image Descriptions: Give each image or project some context.
✅ Use High-Resolution Images: Any image should be sharp and optimized for viewing on the web.
❌ Use Complicated Navigation: The navigation should be simple and easy to use.
✅ Contextualize: Briefly describe each project or series of images to orient the viewer.
❌ Ignore Feedback: Begin embracing constructive feedback when tending to your portfolio.
✅ Make It Easy to Navigate: Obvious labels and an uncluttered layout will make user navigation intuitive.
❌ Use Flashy Designs: Go for a clean design that only brings the best of your work.
✅ Update Regularly: Keep fresh work in your portfolio.
❌ Add watermarks to your portfolio images. Avoid distracting watermarks.
3. Engaging About Page
Yes, you should have an "About Me" page on a photography website. That is where visitors and any prospective client would like to find more information about you. When I access a photographer's website, I always navigate to their "About Me" page to know what makes him different. It means not only the skills with the camera but your story —precisely what that is in photography and what makes you want to capture beautiful moments.
For instance, whenever I go through a website, I mainly connect with those photographers who share a little about their journey and some of their personalities. Through this, I feel the person behind the lens; this helps me build trust and be interested in their work.
I would therefore suggest that this "About Me" page be really well thought out. Share why you like photography, state any specializations you may have, and maybe even some fun facts about yourself. It's a chance to personify your brand in the sight of your readers and share more than just photos—your personality and passion for the craft.
Powerful Tips on About Me Pages: Dos and Don'ts
Dos
Don’ts
✅ Show Your Personality: Let one's passion for photography be alive within the writing.
❌ Avoid Too Much Jargon: Use your words to be available and accessible to a larger audience.
✅ Emphasize Your Expertise: Outline your experience, specialization, and what makes your photo creation exceptional.
❌ Overwhelm with Text: Be succinct and exciting. Visitors should get a handle on the essence of your business in seconds.
✅ Upload High-Quality Images: Add a professional image of yourself and examples of the best work in its respective discipline.
❌ Use Generic Terms: Be specific about how you describe your style and what people can expect from working with you.
✅ Tell Your Story: Discuss what led you to photography and what inspires your creativity.
❌ Use Neglect of Visual Appeal: With text comes the need for pictures, which retain visual interest and professional appeal.
4. Services Offered
So, when a potential client goes to your website, they're dying to know what you can do for them, right? Services are sort of the secret sauce of your portfolio. You're going to make it very easy on them so they may see how exactly you can capture their special moments by clearly listing what you specialize in portraits, events, pet, and even wedding photography.
It's like laying out a delicious menu of options before them—enticing them to explore further and choose you over someone else. Moreover, this section, in addition to listing your skills, actually demonstrates that you have got your game going on—that professionalism? It shines through.
Trust me, I've seen how much of a difference a clear services list makes in turning visitors from curious to excited clients ready for booking. So go ahead, touch up your site with this real eye-catcher of a "Services Offered" section because it's your ticket to blowing away clients and building your photography business!
Powerful Tips for Effective Services Offered Page: Dos and Don'ts
Dos
Don’ts
✅ Clear Service Descriptions: Enumerate each of the services you provide, this could be wedding photography, portrait session or other occasion – anything.
❌ Overwhelming Details: The important thing for the leaking company here is to be careful not to lose the prospective client; as such, it is wise not to include any unnecessary technological information.
✅ Avoid Using Complex Words. It is better to use words that will be familiar to the group of people you are targeting.
❌ Visuals: Do not rely solely on the textual material. Add images or motion videos of high definition to make your potential clients see your potential and the kind and style of the work that you deliver.
✅ Highlight Benefits: Describe how each of the services has got to eliminate a given kind of problem or to meet certain specific client’s needs.
❌ Ignoring SEO: Be sure to optimize your services page with relevant keywords so that it is searchable by potential clients.
✅ Include a portfolio or gallery with examples of your best work for every service provided. Visual examples help clients see what they can expect.
❌ Long Load Times: Be sure that a website loads quickly. Potential clients will be annoyed if they wait too long for the website before viewing its content.
✅ Calls to Action: It is possible to add the evident calls to action and place ‘Book Now,’ ‘Get a Quote’ or ‘Contact Me’ buttons to persuade potential clients into the action concerning the next step.
5. Client Testimonials and Reviews
Making a difference by adding a section on "Client Testimonials" will help in your photography website. But definitely, I look at what other clients said about their experience while scouting around for any photographer—I want to know their experiences, stories, and how much they were satisfied with the photographer's work.
Testimonials engender trust and credibility—in a way, they're like small stories highlighting the natural person who has walked in my shoes before. They show me that you are not saying that you are great; others do so as well. I feel much better about my decision when I read good comments. Again, I know it helps me have more confidence when booking a photographer, having an idea of what they will be like from testimonials that allow me a sneak peek into the experience.
So, having a client testimonials page will go on to help you connect with potential clients and assure them that, yes, you are the right photographer they need for their special moments. It's placing a touch of humanness into your portfolio, which is essential in differentiating you and attracting more bookings.
Powerful Tips for Efficient Client Testimonials Page: Dos and Don'ts
Dos
Don’ts
✅ Be Specific: Mention all the details of the photo session, what exactly was enjoyed a lot, or how the style of the photographer met their expectations.
❌ Vagueness: The testimonial should not be sweepingly generic and devoid of any significant value addition.
✅ Results Showcase: Share any positive outcomes or benefits of working with the photographer, like quality of edited images, customer service, or timely delivery.
❌ Skip Attributions: Always attribute the testimonial to its source. This can be by first, initial, or full name (per client preference).
✅ Use Quotes: Direct quotes deliver authenticity and emotive appeal to a testimonial statement.
❌ Over-Editing: Ideally, the testimonial should be in the author’s own words. As such, they cannot be sanitized to the extent that the true nature of the messages is eliminated.
✅ Permission: Always obtain permission from your customers before placing their testimonials on your website.
❌ Forget Diversity: Let the testimonials of various clients illustrate that your work is multifaceted and speaks to a wider audience.
❌ Neglect Updates: Keep refreshing the testimonials to remain fresh and updated, reflecting your new creations or services.
6. Clear Contact Information
But have you ever thought why including a "Contact Information" section in your photography website remains so essential? I am often asked what the must-haves are for every photographer's website; for me, this one tops the list.
It's essential for several reasons as an experienced photographer. First of all, communication with potential clientele is straightforward, and they want either to hire you for a project or contact you with questions if they like your work. If there isn't any contact information, that interested person may quickly get frustrated and try another photographer.
Furthermore, this contact section is vital because it represents that you are reachable and professional. It gives a feeling of trust and reliability—everything that matters in this industry. I personally always include my email, telephone number, and sometimes even links to my social media so that people will have multiple ways to reach Graphic Design Eye for website design. Sometimes, this small thing can be a kingpin and bring loads of difference in attracting new clients and opportunities.
Powerful Tips for Effective Contact Information Page: Dos and Don'ts
Dos
Don’ts
✅ Place Clearly: Make sure that your contact information is conspicuous and easy to find on all website landing pages. This is usually in the header or footer area.
❌ Obscure Contact Information: Avoid hiding your contact information too deeply on the website. The visitor should not have to search much to get the contact information.
✅ Multiple Points of Contact: Offer several means for potential clients to contact you, such as phone numbers, email addresses, and a contact form.
❌ Overly Complicated Forms: Make your contact form as clean and straightforward as possible. Demanding too much information from first-timers might shoo them away from contacting you.
✅ Use Contact Forms: Integrate an easy contact form that users can fill out directly from your website. This will allow you to keep all inquiries in one place so they do not get lost in the shuffle.
❌ Unsecured Contact Forms: Be sure that the contact form is secure, especially if the form will be capturing sensitive information. Use HTTPS, and consider any other base-level security measures as needed.
✅ Add Social Media Links: If you use social media for business purposes, add a link to your profile. Maybe some clients will be more inclined to contact you on Instagram or Facebook.
❌ No Response: After providing the contact information, make sure that you respond quickly to the inquiries. A late response sometimes kills the business deal.
✅ Specify Business Hours: If applicable, mention your business hours or when it is best to reach you. This will help set expectations and allow clients to know precisely when they can have a response from you.
✅ Consider Privacy: Never display your email address in the open if you're afraid of spam. You can always use a contact form and other utilities to protect or hide email addresses from bots or spiders.
✅ Call to Action: Place a slight call to action alongside your contact information, like, "Get in touch today!"
✅ Generic Emails: Use email addresses with your website domain as much as possible; for example, [email protected] instead of free email providers like Gmail, Yahoo, or MSN.
7. Blog Section
But not to mention that a "Blog Section" on a photography website holds so much power. I know how much of a game-changer it would be from my experience in advising on must-haves for photographers' websites. It's not about sharing your recent work but telling stories.
You will share your ideas, creative process, and challenges through blogging. It makes your work more relatable and engaging to your audience. Another reason is that, through regular updates on tips, behind-the-scenes, and other helpful content on a blog, you will attract more visitors who want to come back again and again.
Also, it keeps your website fresh and active; search engines love these things. Tips, updates, and behind-the-scenes activity enable visitors to get more and more. I started blogging because it helped me connect with my audience more deeply and showed the world exactly why I am a professional in this field. Hence, a blog section can boost your online presence and create new, different prospects and opportunities for your photography business.
Powerful Tips on Effective Blog Section Page: Dos and Don'ts
Dos
Don’ts
✅ Show off Your Work: Let high-quality images speak for your photography.
❌ Overwhelming Text: Keep paragraphs short and use bullet points or subheadings for easy reading.
✅ Tell Stories: The vendor may share behind-the-scenes anecdotes or client experiences to engage readers.
❌ Neglecting Updates: Do not leave the inbuilt blog section outdated; regular updates show your commitment and professionalism.
✅ Educate and Engage: Share some photography tips, techniques, or insight into your creative process.
❌ Ignore SEO: Do not forget about SEO practices such as meta descriptions, alt texts, and internal linking.
✅ SEO Optimization: Use relevant keywords within the title and within the body of the content to show up in search engines.
❌ Low Interaction: Avoid just posting pictures without context or stories; engage with your audience through meaningful content.
✅ Regular Updates: Share and keep your audience engaged by posting regularly.
8. E-commerce Integration
Now, let's highlight another very relevant feature your photography website should have: e-commerce integration. For the most important things a photographer may need on his website, I know its significance from my involvement in consulting.
E-commerce integration will help you sell prints or digital downloads directly from your website itself, turning this passion into profit. This functionality not only provides more convenience to the user but also increases your client network worldwide, eliminating geographical barriers. It also shows all of your work in a very professional way in front of visitors to browse and buy your products easily.
I have observed that putting e-commerce features is an outstanding way to reach larger audiences and create a continuous flow related to income through my photography. I have experienced how integrating SEO optimization can increase my reach tremendously and ensure a sustainable income stream for my photography. This magnificent feature will turn your website into a powerful multi-functional platform—not just to showcase but also to commercialize your artistic works.
Powerful Tips on Effective E-commerce Integration Page: Dos and Don'ts
Dos
Don’ts
✅ Clear Product Descriptions: Provide a detailed product description for each product, including size, materials, and options.
❌ Avoid Overcomplicated Checkout: A long or complicated process should be avoided.
✅ Easy Navigation: Include an easy-to-use interface that reflects easy navigation so you can continue going through the store and purchasing the current products readily.
❌ Ambiguous Policies: Clearly state shipping, return, and refund policies to manage customer expectations.
✅ Secure Payment Options: Provide trustworthy and secure payment options to ensure customer trust in the business.
❌ Ignore Mobile Users: Make sure your website is mobile-friendly. Other users do; numerous of them use their smartphones and tablets to get online.
✅ Customer Support: Provide responsive customer support for numerous inquiries and issues.
Endnote
So let me ask you, what do you have on your mind? And that’s where we end the tour of 8 necessary elements for every photographer’s website. But do not lose heart; your photographic expedition is only beginning. You should indeed proceed and build a stunning website by initially choosing the best of your work to present and then presenting it to persuade a fashion that complies with your specific aesthetic or vision.
Do not forget that a website is so much more than a gallery of images—it is your business’s window. It has to not only look fancy but really scream professionalism and trust to your potential clients. In this area, web design is vital; therefore, it is wise to provide detailed contact information, positive reviews, and a call to action that would prompt potential clients to contact the service provider or book a service.
But, if you need professional assistance from a web design agency to improve the appearance of the website, then turn to Graphic Design Eye. We provide full-fledged custom landing page design services and any type of website and graphics based on requirements. Therefore, feel free to reach out to us today!
Designing is an art to me and proper instruction can make you the expert one. Hi, I'm Michael the graphic design expert. Depending on my experience and research I've written out about how to become a graphic designer. Hope this will help you to know new things.