It’s worth mentioning that this changes everything because these small mistakes can make your photos look messy and professional.
Interestingly enough, I never realized how much these tiny details matter.
What stands out to me the most is how fixing these distractions makes your photos look clean and high-quality. It’s a small point, but it makes a big difference.
And what’s fascinating about this is how it all connects: the more you avoid these problems, the better your photos will look.
In this guide, we will look at 17 things to avoid capturing in your product photo frame.
You’ll learn how to spot these distractions before they ruin your shots.
You’ll also learn how to take photos that look clean, polished, and ready to impress.
By the end, you’ll have all the tips to make your product photos look their best. Let’s dive in!
Let's explore some of the common environmental elements you need to look out for (and how you can easily fix them.
When taking pictures of your product, it needs to be clean. Dust, dirt, and fingerprints can hide the details of your product.
Even a tiny smudge can make it look messy. This can make your product seem less professional and less attractive.
Clean products always look better.
It helps build trust with your audience. When your product looks good, it stands out more in a crowded market.
Cleaning your product before every shot may take time, but it will save you trouble later. These simple tips will help you keep your product looking great in every photo.
| Problem | Solution |
|---|---|
| Dust on the surface | Wipe the product with a microfiber cloth. |
| Fingerprints on shiny areas | Use an alcohol wipe to clean the oils off. |
| Dust in the background | Clean the backdrop and nearby areas. |
| Smudges on the lens | Always clean the camera lens before you shoot. |
It’s easy to make mistakes when handling your product, like touching it after cleaning or not checking it under the right lighting. These small mistakes can mess up your final photo, but they are easy to fix. Let’s look at some common mistakes and how to avoid them:
Having the right tools can really help you keep your product clean. The right equipment can stop dust from sticking to your product during the shoot. Here are the tools you need for perfect photos:
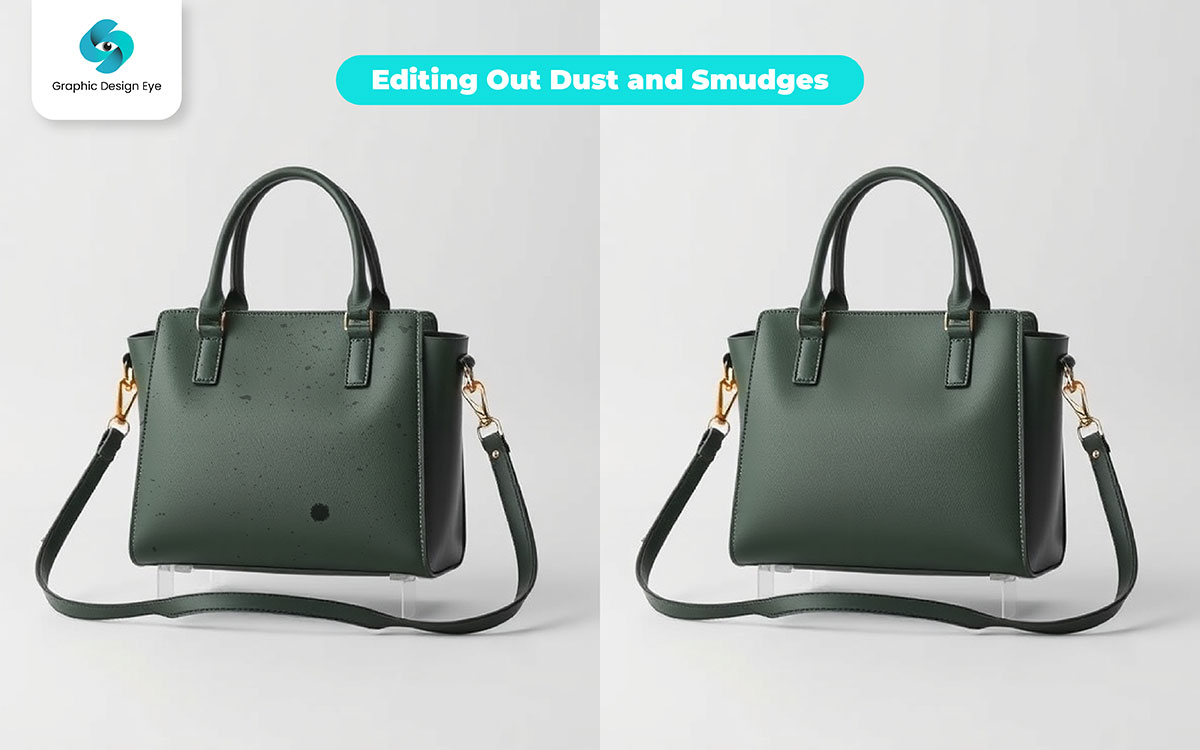
Sometimes, even after doing your best, you might miss a dust spot or smudge.
No worries! You can fix small issues in editing. Here’s how to clean up your photos with Photoshop:
You won’t believe how much easier shooting can be with an anti-static cloth. Before you start shooting, wipe down your product with it.
Anti-static cloths help stop dust from sticking to your product. They also reduce static.
This keeps your product cleaner for longer, saving you time during the shoot.
Imagine this: You set up the perfect product shot. The lighting is just right, and the product looks amazing.
But wait—there’s a big distraction in the corner. It’s a visible cable sticking out like a sore thumb. Cables can make your photos look cluttered, pulling the focus away from the product.
And speaking of which, it’s such a tiny detail, but it really messes up the whole look.
Instead of noticing your beautiful product, people notice the messy cables. It’s frustrating, right? Keeping cables out of the frame makes everything look polished and professional.
On the flip side, ignoring them can make even the best photo look sloppy.
We’ve all been there—setting up the shot perfectly and then realizing a cable is peeking out.
Funny enough though, it’s usually when you’re almost done shooting. Here are some quick and easy fixes to hide those pesky cables and keep your photos looking clean:
| Cable Issue | Solution |
|---|---|
| Charging cables in the frame | Unplug and tuck cables behind or below the product. |
| Power cords showing in the background | Use cable clips or zip ties to keep them out of sight. |
| Loose cables on the table | Tape them under the table or behind the product. |
Picture this: You finish a great photoshoot, only to see cables ruining the shot when you review the pictures.
Ouch! It happens more often than you think. Some mistakes are so easy to make, like forgetting to check for cables after plugging something in.
Here are some common cable mistakes that can mess up your photos:
If I’m being real, managing cables is half the battle when setting up product shots.
But having the right tools can save you a lot of trouble.
These simple items can keep your cables neat and out of sight, giving your photos a professional touch:
Sometimes, you just need a quick trick to hide a cable. You won’t believe this, but even simple tape can do wonders! Here are a few hacks to get rid of cables without any special equipment:
Switching gears a bit—let’s talk about a quick checklist before you start shooting. Running through this list helps make sure no cables sneak into your photo:
Wait for it... even if you miss a cable or two, there’s still hope! Editing software can help you remove them easily. Here’s how you can fix it in post-production:
Well, that’s that! One simple way to avoid cable trouble is to use wireless devices whenever you can.
Wireless gadgets like Bluetooth speakers and battery-powered products can make your life so much easier.
Without any cables to worry about, your photos will look cleaner and more professional. And guess what? You save yourself a lot of hassle too!
Let me set the scene: You’re scrolling through an online store, and you spot a product photo that shows the item with its box, bubble wrap, and stickers still on it.
You know when you see that, right? It feels cluttered, almost like the product is hidden away.
Clean product photography should focus on the item itself, not the packaging. Because why not let the product shine on its own?
Here’s the kicker: Including packaging can hide details and make the product look less appealing. It’s one of those common eCommerce photography mistakes you want to avoid if you're serious about increasing your conversion rate.
Let’s circle back to the essentials. Here’s a list of things to avoid in product photos when it comes to packaging:
| Packaging Problem | Quick Fix |
|---|---|
| Box or bubble wrap in the frame | Remove the packaging before the shoot starts. |
| Stickers left on the product | Peel them off and clean up any sticky marks. |
| Reflections from packaging | Change the angle or adjust the lighting. |
To be honest with you, unpacking sounds simple, but it’s easy to slip up. Here’s what you should watch out for:
Here’s the kicker—showing off the product without packaging makes it shine!
To give you an idea, place the item against a plain background and use close-ups to capture all the beautiful details. Creative styling can also make your product look amazing, especially when it’s in use.
Let’s be clear: there are a few times when it’s actually okay to show the packaging. For example:
Here’s a quick checklist so you don’t miss anything:
Let’s say you missed a spot—don’t worry. Editing can save the day. Here’s what you can do:
Pro Tip: Remove stickers early on to avoid any sticky mess that might show up later in the product photo frame.
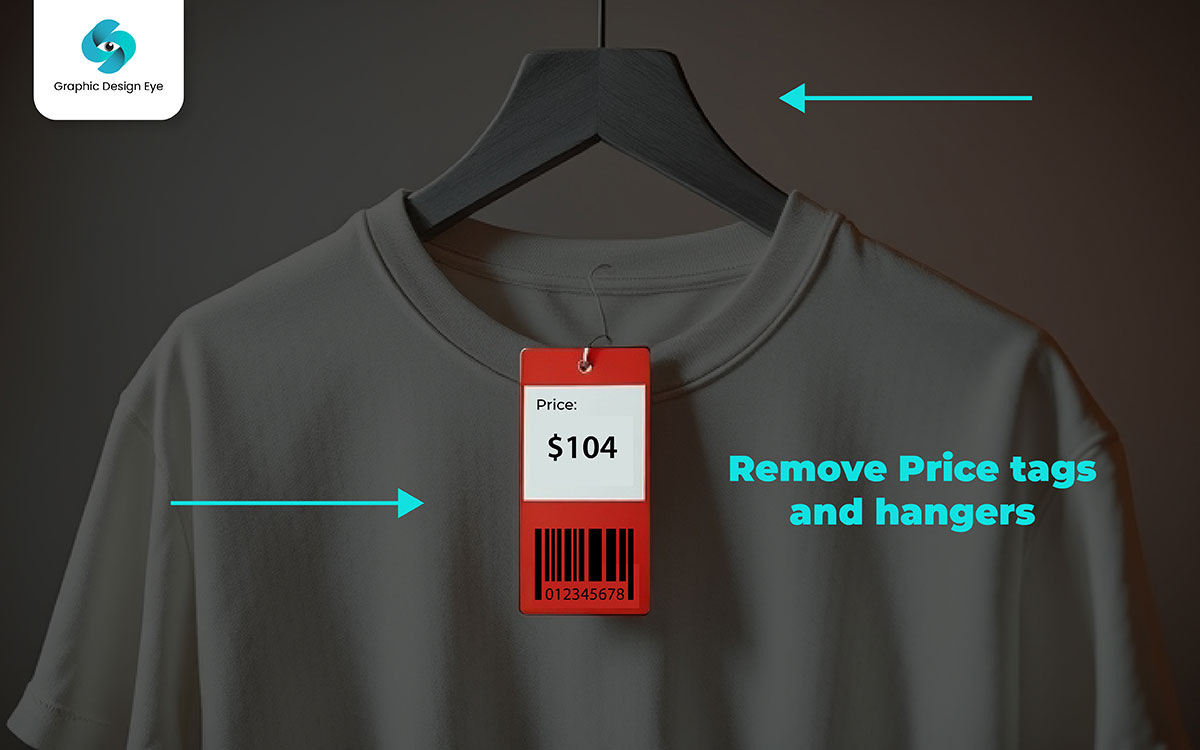
Imagine you’re browsing a product photo, and there it is—a big, distracting price tag still attached.
Honestly, here’s the deal: Price tags make your product look cheap and unprofessional. It’s one of those things to avoid in product photos if you want to keep the focus on the product and not on random, leftover tags.
To give you an idea, here’s how to handle common tag troubles:
| Tag Problem | Solution |
|---|---|
| Price tag stuck on the product | Use a tag remover or an alcohol wipe. |
| Sticky residue left behind | Clean it with an adhesive remover or alcohol wipe. |
| Hidden tag missed during the check | Double-check all seams and corners before the shoot. |
Trust me, it’s easy to overlook these mistakes:
Having the right tools makes tag removal a breeze:
Hanger marks can mess up a clothing photo. Here’s how you avoid them:
Run through this checklist before snapping photos:
Oops, spot a leftover mark? Here’s what you can do:
Pro Tip: Use a Tag Remover to Avoid Sticky Residue.
I once shot a product photo with a beautiful item, but there was a glaring window reflection right in the middle. You can’t make this stuff up!
Background elements like windows and doors can easily distract from the main product, causing unwanted reflections and shadows. This is a classic eCommerce photography mistake that can tank your conversion rate.
Try these fixes for tricky backgrounds:
| Background Problem | Solution |
|---|---|
| Reflections from a window | Use blackout curtains or reposition your product. |
| Visible door frame in the shot | Crop the image or change the camera angle. |
| Clutter in the background | Use a plain backdrop to remove distractions. |
A clean product photography setup makes all the difference:
Here’s what helps me keep backgrounds tidy:
Run through this list before shooting:
Found a background issue after the shoot? Try this:
Pro Tip: Use a solid backdrop for a professional look. It keeps the focus on your product and gives your photos a polished vibe.
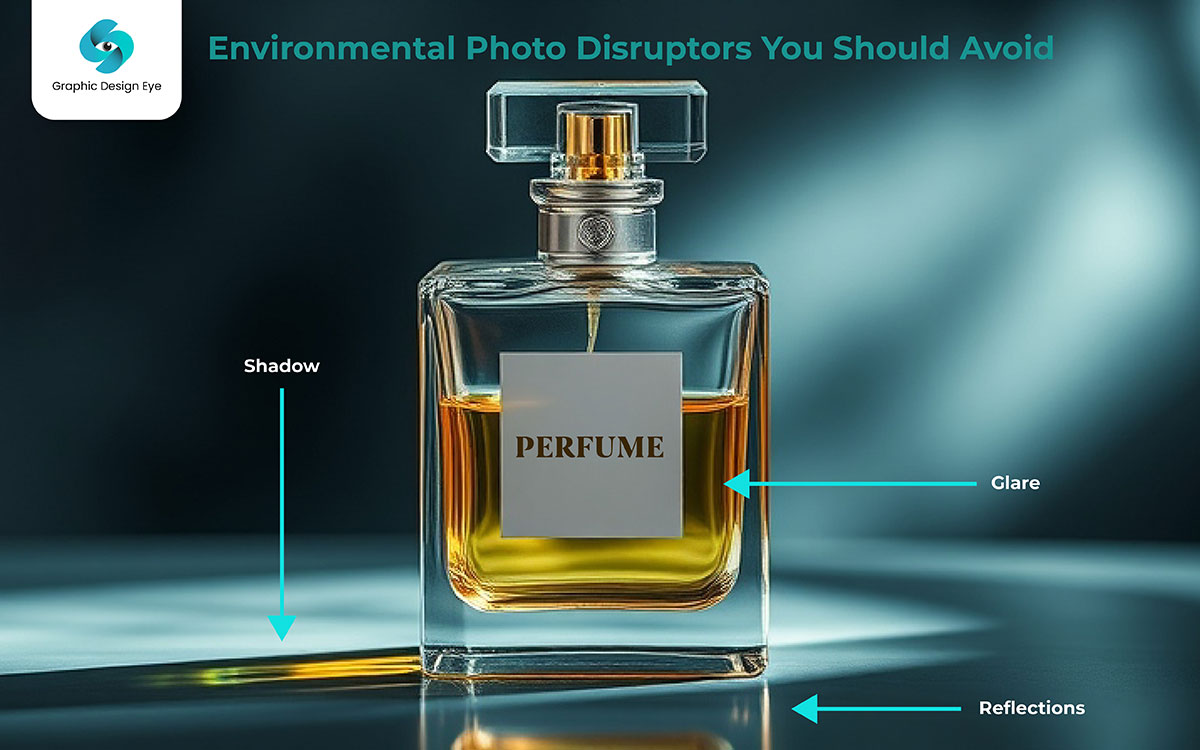
Let’s dive into common environmental photo disruptors to avoid in your product photo frame—and how to fix them!
Here’s another thing: reflections and glare can destroy your photos. When light bounces off shiny surfaces, it creates bright, ugly spots that take the viewer’s eyes away from the actual product.
Imagine seeing a shiny spot on a glass bottle that blocks the label—you can’t even read what it says! It’s like putting a smudge on your photo.
For clean product photography, it’s super important to keep reflections away. Otherwise, you’ll end up with photos that look amateur, and trust me, that hurts your conversion rate.
Oh wait, I forgot to say: tiny angle changes can make a huge difference here!
So here’s what happened: I struggled with reflections on a shiny product once, but then I used a polarizing filter—it was a game changer!
It’s a small tool that reduces glare by filtering out the light bouncing off the surface.
| Reflection Problem | Quick Fix with Polarizing Filter |
|---|---|
| Glare on glass items | Attach a polarizing filter and rotate it |
| Bright spots from lighting | Slightly adjust the filter’s angle |
| Reflections on metal surfaces | Change the filter position until glare fades |
Direct, harsh lighting is usually the culprit for glare. Here’s where it gets interesting—soft, diffused light can solve this.
And you know what’s funny? Using a diffuser is like putting sunglasses on your light source.
It spreads the light out, making it softer and less harsh. This reduces those annoying bright spots and shadows.
With a diffuser, your product gets highlighted beautifully without any distractions. It’s essential for achieving clean product photography.
Oh, and before I forget—always check your frame for reflections. Move around a bit and see if you spot any unwanted reflections, especially on glossy surfaces. It’s better to fix this now than spend hours editing later.
Sometimes, even with all precautions, reflections sneak into your photos. But get this—you can fix them by editing Photoshop.
Pro Tip: Choose matte or non-reflective surfaces for your products. It’s a simple trick to cut down on reflections from the start.
If you see tripods, lights, or cables in your product photo, it’s a huge distraction. The viewer starts focusing on your gear instead of your product. It’s a classic eCommerce photography mistake.
A clean frame without visible equipment makes the photo look more professional.
And here’s where it gets fun—you can hide the gear with a few simple tricks.
Sometimes, equipment shows up in the shot, but don’t worry! Here are some easy fixes to keep things clean:
| Visible Equipment Issue | Quick Fix |
|---|---|
| Tripod legs showing | Raise the camera angle |
| Light stand visible | Shift the light behind the product |
| Cables peeking out | Tuck them behind the backdrop |
Guess what? Remote triggers are a lifesaver. They let you take photos without touching the camera, reducing the chance of the camera shaking and keeping your hands out of the frame. It’s especially helpful if you plan to optimize images later for better clarity.
And there’s this too—editing can easily fix leftover equipment in the shot.
Pro Tip: Keep your setup organized. It makes cleanup easier and saves time when you edit.
You know what’s weird? The background can make or break your product photo.
Bold, clashing colors can steal the spotlight from your product, making it look less appealing.
It’s one of those sneaky eCommerce photography mistakes that can lower your conversion rate.
A neutral, complementary background helps your product shine without any distractions.
So yeah, basically, the right background color makes your product pop.
A busy background can steal focus from your product. Here’s how to keep it simple and neat:
| Problem | Solution |
|---|---|
| Bold patterns | Switch to a plain backdrop |
| Clashing colors | Choose neutral tones |
| Textured backgrounds | Opt for a smooth surface |
And then I realized: solid color backdrops are a game changer. They give your photos a clean, polished look without any distractions. It’s a must for achieving high-quality, clean product photography.
Oh right, I almost forgot—always double-check your background against the product. If the colors look busy or clash, switch to something neutral. It saves you from heavy editing later.
A subtle gradient background adds depth to your photo without distracting from the product.
If the background looks too intense, don’t worry—editing can fix it.
Pro Tip: Invest in seamless paper backdrops. They provide a clean, professional look and make editing a lot easier.

Personal items can sneak into your product photos without you noticing. Let’s see what to avoid.
I’ll be honest: one of the simplest mistakes in product photography is leaving personal belongings in the shot. It’s so easy to miss.
You might be focused on getting the perfect angle, and suddenly your phone, keys, or even your coffee cup appear in the photo.
When you’re designing a product for something like a brochure design, a clutter-free image makes a huge difference.
Personal items in the background can look unprofessional and take away attention from the actual product.
Even a small object left behind can distract viewers and hurt your product’s appeal. Your goal is for people to focus only on your product, not on random things lying around.
Believe it or not, people often leave these things in their photos:
It’s not just about looking good—it’s about making your product look its best. Here’s how you can quickly tidy up before taking pictures:
If you need to clean up your shooting area fast, these tools can help:
| Tool | How It Helps |
|---|---|
| Basket/Box | Holds small, random items easily. |
| Cleaning cloth | Wipes away dust or smudges. |
| Trash bag | Collect any clutter or waste. |
| Organizer tray | Keeps important tools neat. |
Pro Tip: Always do a full check of the area before you take the photo. You might spot something you missed earlier!
Here’s something important: Sometimes we get so focused on the product, we forget to check what’s in the background. If you’re not careful, you might show sensitive information like receipts, invoices, or client addresses in your photo.
Imagine posting a product photo online and realizing later that someone’s private details were visible. This could lead to a big privacy issue, and that’s the last thing you want. If you ask me, it’s better to double-check and avoid any risk.
The truth is, certain items get overlooked a lot:
If you spot sensitive information in your photo, here’s what you can do:
| Solution | Why It Works |
|---|---|
| Blur the details | Hides private information easily. |
| Crop the image | Cuts out the part with sensitive info. |
| Use clone tool | Covers up the data with background. |
| Editing apps | Quick tools to fix privacy issues. |
The best way to deal with this issue is to prevent it from happening:
Pro Tip: A simple, clean background can help you avoid showing any private details by accident. It makes your photos look professional and focused.
I’ve seen this happen a lot: You take a great product photo, but a rival brand’s logo sneaks into the background. This small mistake can create a lot of confusion.
If people see a competitor’s logo in your photo, they might think there’s a partnership or some kind of endorsement.
This can hurt your branding. The way I see it, it’s always better to keep your photos free from any competing logos or branding.
You’d be surprised how often logos appear where you least expect them. Here’s how to keep them out of your shots:
Here’s a quick look at items where branding often gets overlooked:
| Item | Where the Logo Might Be |
|---|---|
| Tools | Logos printed on the side or handles. |
| Props | Labels on bottles or packaging. |
| Background decor | Logos on books, gadgets, or posters. |
| Clothing | Small logos on sleeves or pockets. |
Many photo editing companies use these tools to help remove unwanted logos:
Pro Tip: Keeping your photos clean and free from distractions aligns with the basics of catalog design, including the use of the right typography and effective shadows. This way, your product remains the main focus.
Let’s explore how personal and private items can sneak into your photos and make them look unprofessional—here’s how to fix that!
Reflections can mess up a perfect shot. When light hits shiny surfaces like glass, metal, or even your camera lens, it can show your reflection.
This makes the photo look unprofessional. Instead of focusing on the product, the reflection of you or your gear steals the spotlight. Nobody wants to see that. A clean, reflection-free image keeps your product the focus.
Reflections are easy to miss. Items like mirrors or shiny packaging can end up showing your reflection. Here are common items that reflect:
Avoid reflections with these tips:
You’d be surprised how often reflections sneak in. We focus so much on the product that we miss shiny surfaces.
Things to avoid capturing in product photo frames, like mirrors or glass, can easily show reflections of you or your gear. Always check for reflections before you take the shot.
Before clicking, use this checklist:
Pro Tip: A polarizing filter can help cut down on reflections and glare.
Stray body parts can sneak into your shots. It might be a finger, hand, or even a foot. These can make the photo look messy.
A small part of your body can distract from the product. Focus on the product, not your limbs. Keep your shot clean for a more professional look.
Here are easy ways to keep your body out of the frame:
It’s easy to miss stray limbs in the shot. When you focus on the product, your hands or feet can sneak in.
This can make the photo look unprofessional. Take a moment to check your frame before snapping.
If you catch yourself in the shot, do this:
| Solution | How It Helps |
|---|---|
| Crop the image | Cut out the unwanted part of the shot. |
| Retake the photo | Get a fresh shot with careful framing. |
| Use a clone tool | Cover up stray limbs in editing software. |
| Adjust your stance | Move a little to stay clear of the frame. |
Check these points before shooting:
Pro Tip: Place markers on the ground to remind you where to stand.
Pets can mess up your product shots. They may not be in the frame, but they can still cause trouble.
Fur, movement, or even knocking things over can be distracting. I learned this the hard way when my dog jumped into a shot. Pets can easily ruin a clean shot. Keep them out of the frame for a better photo.
Here’s how to keep pets out of the frame:
Pets add a fun element, but they can mess up your shot. Fur can float into the frame, and their movement can cast shadows. Pets can steal focus from your product. Keep them out of the frame for a cleaner look.
Here’s how to avoid pets in your photos:
| Best Practice | Why It Helps |
|---|---|
| Close doors to keep pets out | Stops pets from wandering into the shot. |
| Vacuum the space | Removes pet hair from the shot. |
| Check lighting | Prevents shadows from pets in the photo. |
| Remove pet items | Keeps toys or bowls from sneaking into the shot. |
Before shooting, check for these:
Pro Tip: Keep a lint roller nearby to clean up any stray fur.
Let’s look at the common technical issues that can mess up your product photos and how to fix them for perfect shots!
Bad lighting can ruin your photos. It can make them too bright or too dark. This hides details and can make your product look flat. Without good light, your photo won’t show off the product well.
Good lighting shows off your product’s features and details. It makes everything look clear. It’s important to get it right.
If your photos have bad lighting, here’s how to fix it:
Overhead lights make your product look flat. It creates bad shadows and uneven light. Mix different lights to make your product look better.
Here’s a list of equipment for better lighting:
| Equipment | What it Does |
|---|---|
| Softboxes | Softens light and gets rid of shadows. |
| Ring Lights | Light your products evenly. |
| Reflectors | Bounces light onto dark spots. |
| Light Stands | Lets you move lights where needed. |
| LED Panels | Adjustable light for better control. |
Before you take the photo, make sure:
If your photo still needs help, use editing tools to:
Pro Tip: Test lighting before you start shooting. It helps you find what works best.
Blurry photos look bad. If your product is out of focus, it’s hard to see the details. Blurry photos can make your product look unprofessional. Clear photos show off the details that make your product special.
Blurry photos happen because of:
Here’s how to fix blurry photos:
Sometimes, the background gets focused instead of the product. This makes your photo blurry and less effective. Always focus on the product.
Use these tools to make sure your photo is sharp:
| Tool | What it Does |
|---|---|
| Tripod | Stop the camera shake. |
| Manual Focus | Lets you control the focus. |
| Autofocus Lock | Keeps focus on the product. |
| Focus Peaking | Highlights areas in sharp focus. |
Before taking the photo, check:
In editing, you can:
Pro Tip: Use manual focus for close-up shots to get it just right.
Too much editing makes photos look fake. Filters or too many changes can hide the real product. People want to see the product as it is. If your photo looks too smooth or colorful, it can make customers doubt the product.
Editing should help, not hurt. Keep it natural. Small edits keep the photo real and show off the product’s best features.
If you’ve edited too much, you might see:
Don’t change the color of your product with filters. People want to see what they’re buying. Changing the color can make them unsure about the product.
Use these tools to keep your edits natural:
| Edit Tool | What it Does |
|---|---|
| Adobe Lightroom | Adjusts color and light without overdoing it. |
| Photoshop | Gives you detailed editing options. |
| VSCO | Soft filters for natural effects. |
| Capture One | Great for color correction. |
Before you finalize the photo:
To keep things looking natural:
Pro Tip: Keep edits minimal to help your photo look real. People trust real photos more.
I didn’t see that coming when I started taking photos and realized the backgrounds were full of props I didn’t want there.
It suddenly hit me that a clean background actually makes a huge difference.
And here’s the wild part you won’t believe: you don’t need fancy equipment to fix this. If you really think about it, it’s just about knowing a few simple tricks to get that perfect, clean look.
Now, here’s a twist you didn’t see coming: with a few easy steps, you can do this right at home. I was just about to say the same thing—it’s simpler than it sounds.
Steps for a Clean Background Without Props:
I have to admit, it wasn’t what I expected when I started using these tricks, but now I get clean backgrounds every time. And here’s the best part of the whole thing: you can do this all easily at home.
Now that I think about it, it’s kind of funny how often distractions pop up in photos. I used to think I had to retake every shot.
But then I found out there’s software that can help.
Let me tell you, it’s not what you’d expect at all—these tools are super easy to use, even if you’re a beginner like I was.
But here’s the part that really got me thinking: with just a few clicks, you can completely erase anything you don’t want in the background.
You won’t believe what happened after that! I started fixing all my old photos, and they looked great. And out of nowhere, I was editing like a pro!
Best Software for Removing Distractions in Photos:
It was one of those moments where I realized how much time I wasted worrying about props. Now, I just edit them out in seconds.
In the end, what matters most is knowing the things to avoid capturing in product photo frame. I didn’t realize this until later on, but it’s crazy how one small thing can change everything.
What makes it even better is this: once you avoid these distractions, your photos will look cleaner and more professional.
Here’s where it all started making sense: paying attention to small details really helps.
The funny part is, I never expected it to go this way, but now I see it. It’s like the pieces of the puzzle just clicked into place.
Here’s a fun fact that changes things a bit—avoiding these distractions makes your photos stand out. What’s really surprising is how easy it can be once you know what to look for.
Have a great day! 🎉